实现:百度 lowcode 框架 amis 框架封装

简单记录一下百度 lowcode 框架 amis 的封装历程。

什么是 lowcode

前端真的太卷了,总是会出现一些莫名其妙的新概念、新名词。

但仔细看往往会发现,其实不是什么新技术,而是旧的思想焕发新生。

lowcode 指的是低代码开发,是通过配置或者图形化,来生成程序。

在上家公司做的拖拽生成页面的项目,也算是 lowcode 了。

对于前端来说,很主要的一个应用就是通过配置生成界面。

为什么要用 lowcode 开发前端

admin 团队,主要维护内部系统。

内部系统的需求,往往都是增删改查数据。

例如一个库存系统,主要页面就是 => 列表页,查询记录,详情页,增加一个条目,编辑一个条目,删除一个条目。

此模式的的页面,占总页面的比例很大。

并且因为功能相似,代码较为重复,会耗费很多无意义的开发时间。

这种页面的常见模式一般是:

1
2
列表页:表单+按钮+表格
详情页:表单+按钮

把这种模式的页面抽象起来,变成用配置描述的形式,如:

1
2
3
4
5
6
7
8
9
10
11
12
13
14
15
16
17
18
19
20
21
22
23
24
25
26
27
28
{
// 页面标题
title: 'xxx',
// 表单
form: {
// 提交的url
url: 'http://xxx.com/post',
// 表单项
items: [
{
type: 'input',
field: 'name'
},
{
type: 'button',
action: 'submit'
}
]
},
table: {
sortable: true,
columns: [
{
name: 'cloumn1', prop: 'prop1'
}
]
}
}

通过配置的形式,快速生成 vue 组件,最后生成页面,可以减少开发时间。

后期文档完善后,甚至可以让产品同学直接参与配置页面。

当功能成熟以后,也可以作为一种新的约束、规范,避免设计出奇奇怪怪的交互。

但这也不是没有缺点。

所有的工具,能力都是有边界的,lowcode 没有办法顾及所有形式的页面。

复杂的的场景还是需要单独开发的。

选型

lowcode 其实已经有一些成熟的框架了,例如百度的 amis, 例如 umijs/sula。

鉴于 amis 的 star 数量远远超过其他,社区也比较完善:

  • 由百度团队维护
  • 大量内置组件(100+)(内容丰富)
  • 支持自定义组件来拓展 (拓展能力强)
  • 经历了长时间的实战考验 (bug 少,使用人数多)

所以选择了 amis。

目前团队使用的技术栈是 vue, 但 amis 是基于 react 开发的,这就需要经过一层转换了。

利用高阶组件的原理,可以将 amis 封装转换成 vue 可用的组件。

实现目标

最终需要实现的效果是:暴露一个函数,入参为 json 配置,输出一个 vue 组件。

1
2
3
4
5
6
renderer(json, options) {
// process amis here
....
// return vue component
return vueComponent
}

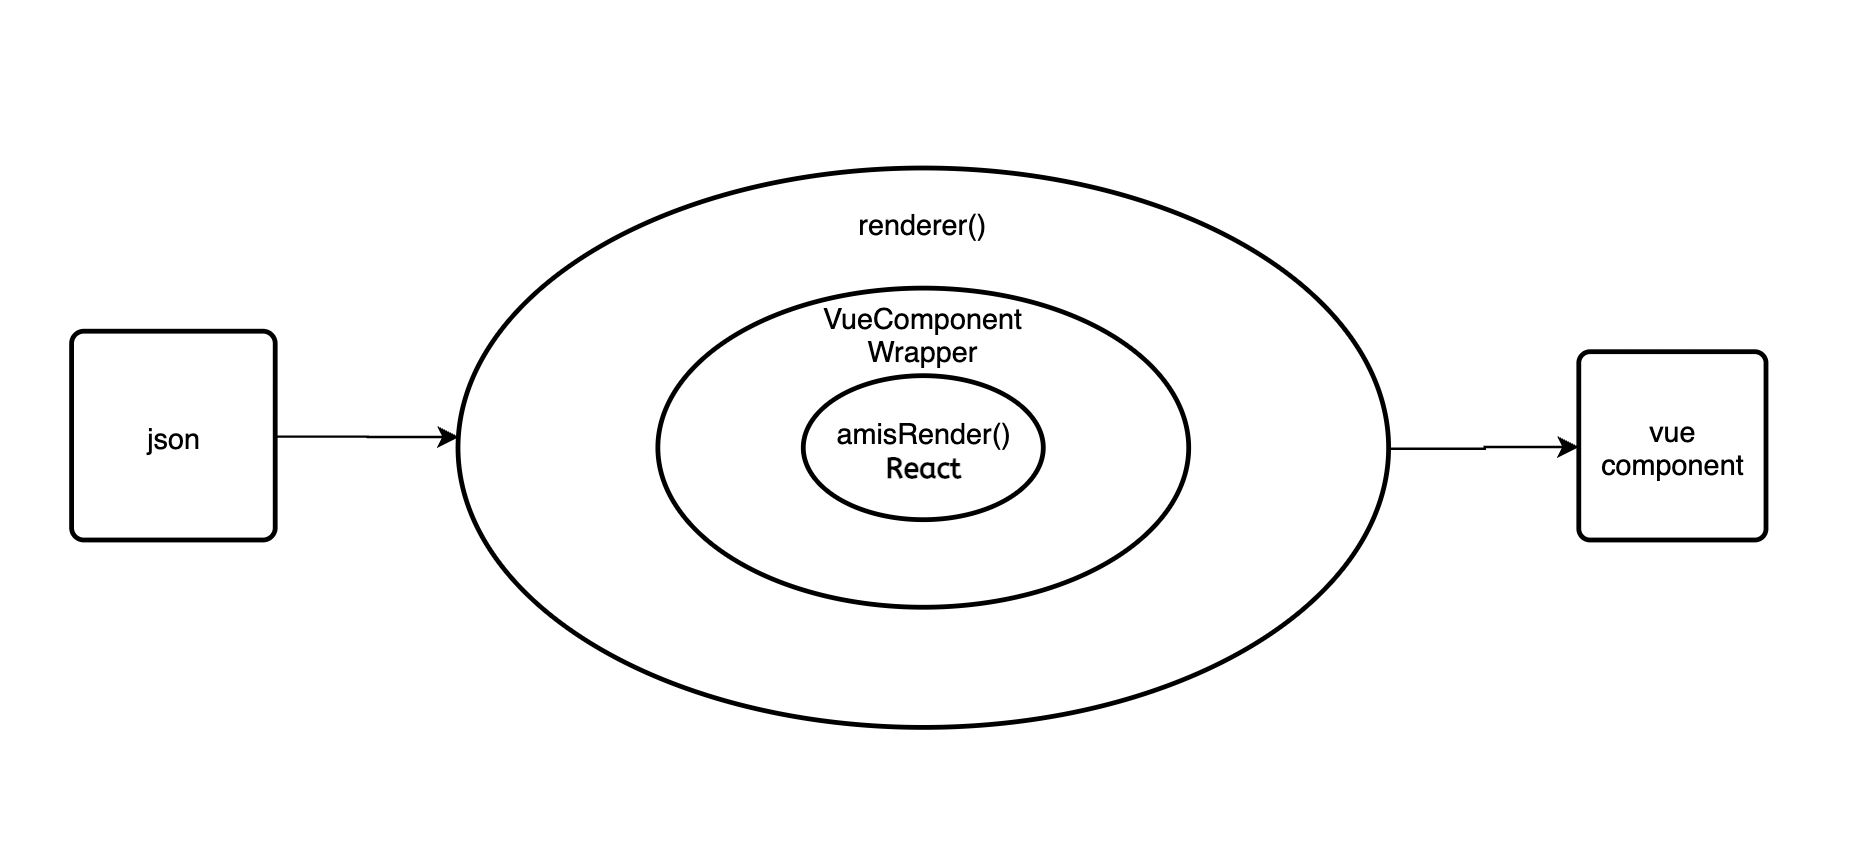
思路如下图

  1. amisRender() 会生成一个 React 组件
  2. 我们在 React 组件上层包裹一层 Wrapper 组件(Vue)
  3. 最后实现一个 renderer() 方法,再对第 2 步的 Vue 组件做一层包装,返回新的 Vue 组件
第一步:实现 Wrapper 组件(Vue)

  1. html 模板。我们定义一个 Vue 组件的模板,包含一个元素,元素节点引用名称为 ’amis‘。
1
2
3
4
5
6
<template>
<div class="amis-page">
<!-- 元素节点引用名称为 ’amis‘ -->
<div ref="amis" />
</div>
</template>
  1. 引入 amis 相关文件以及 React
1
2
3
4
5
6
7
8
9
10
11
12
<script>
// React
import React from 'react'
import ReactDOM from 'react-dom'
// amis 依赖的样式文件
import '@fortawesome/fontawesome-free/css/regular.css'
import '@fortawesome/fontawesome-free/css/fontawesome.css'
// 引入 amis
import { render as renderAmis } from 'amis'
// amis 样式文件
import AmisStyle from 'amis/lib/themes/antd.css'
</script>
  1. 组件接受一个 json 串,因此定义一个 prop,名为 schema
1
2
3
export default {
props: ['schema'],
}
  1. 在组件 mounted 后,我们开始使用 react 挂载 amis。
1
2
3
4
5
export default {
mounted() {
this.mountReactComponent()
},
}
  1. mountReactComponent 方法具体写法
1
2
3
4
5
6
7
8
9
10
11
12
13
14
15
16
17
18
19
20
21
22
23
24
25
26
27
28
29
30
31
32
33
34
35
36
37
38
export default {
methods: {
mountReactComponent() {
// 获取当前Vue实例
let $vm = this
// 定义 amis 需要的参数
let passedProps = [
// 参数一,json配置
this.schema,
// 参数二,一些amis支持的配置,主要是配置需要传入的业务数据
{
locale: this.amisLocale, // locale: "en-US",
// 一些可能用到的参数
data: {
userInfo: $vm.userInfo,
},
},
// 参数三,同样是一些amis支持的配置
{
theme: 'antd', // 主题
fetcher: () => {
// 这里可以在请求之前做一些操作
// 例如设置自定义请求头
// 例如设置 amisGetRespIntercept 请求、响应拦截器等等
}, // 用来覆盖请求方法
jumpTo: (to /*目标地址*/, action /* action对象*/) => {}, // 用来覆盖跳转方法
// ...
// ...
// ...
},
]
// 关键 -------------------------------------------------------------------------
// 挂载 React 组件,挂载元素是 this.$refs.amis
ReactDOM.render(<div>{renderAmis(...passedProps)}</div>, this.$refs.amis)
},
},
}
  1. 完整代码
1
2
3
4
5
6
7
8
9
10
11
12
13
14
15
16
17
18
19
20
21
22
23
24
25
26
27
28
29
30
31
32
33
34
35
36
37
38
39
40
41
42
43
44
45
46
47
48
49
50
51
52
53
54
55
56
57
58
59
60
61
62
63
64
<template>
<div class="amis-page">
<!-- 元素节点引用名称为 ’amis‘ -->
<div ref="amis" />
</div>
</template>
<script>
// React
import React from 'react'
import ReactDOM from 'react-dom'
// amis 依赖的样式文件
import '@fortawesome/fontawesome-free/css/regular.css'
import '@fortawesome/fontawesome-free/css/fontawesome.css'
// 引入 amis
import { render as renderAmis } from 'amis'
// amis 样式文件
import AmisStyle from 'amis/lib/themes/antd.css'

export default {
methods: {
props: ['schema'],
mounted() {
this.mountReactComponent()
},
mountReactComponent() {
// 获取当前Vue实例
let $vm = this
// 定义 amis 需要的参数
let passedProps = [
// 参数一,json配置
this.schema,
// 参数二,一些amis支持的配置,主要是配置需要传入的业务数据
{
locale: this.amisLocale, // locale: "en-US",
// 一些可能用到的参数
data: {
userInfo: $vm.userInfo,
},
},
// 参数三,一些amis支持的配置
{
theme: 'antd', // 主题
fetcher: () => {
// 这里可以在请求之前做一些操作
// 例如设置自定义请求头
// 例如设置 amisGetRespIntercept 请求、响应拦截器等等
}, // 用来覆盖请求方法
jumpTo: (to /*目标地址*/, action /* action对象*/) => {}, // 用来覆盖跳转方法
// ...
// ...
// ...
},
]
// 关键 -------------------------------------------------------------------------
// 挂载 React 组件,挂载元素是 this.$refs.amis
ReactDOM.render(
<div>{renderAmis(...passedProps)}</div>,
this.$refs.amis
)
},
},
}
</script>

以上是 Vue 组件的包装,但只是简化的代码,实际情况并没有那么简单。
我们还需要加入:

  1. 权限拦截
  2. 多语言
  3. 弹窗,confirm 等组件
  4. 实现 fetcher 中的请求方法自定义

这些部分涉及业务逻辑,在这里我就不写了。

第二步:实现 renderer 函数。

Vue 组件实现完成后,接下来实现 renderer 包裹层。

这里使用了 vue-compose 这个库,这个库可以实现类似 vue.extend 的功能

vue-compose 提供的 compose 方法,接受一个 vue 组件或者类 vue 对象,生成一个新的 vue 组件。

1
2
3
4
5
6
7
8
9
10
11
12
13
14
15
16
17
18
import { compose, withProps } from 'vue-compose'
import BaseComponent from './baseComponent.vue' // 上一步实现的Vue组件
import { amisWrapper } from './amisWrapper.js'

// 暴露的函数
const renderer = (schema, opts) =>
// vue-compose 接受一个 vue 组件,加入一些参数,生成一个新的 vue 组件。
compose(
withProps({
schema() {
// 这里增加了一层 amisWrapper 包裹,用来对传入的json做一层转换(可选)
return JSON.parse(amisWrapper.call(this, schema, opts))
},
})
)(BaseComponent)

// 暴露 renderer 函数
export { renderer }

使用

经过上面的两步封装,已经可以正常使用了。

先按照 amis 的规范,写一份 json 配置文件。

这里用 JSON.stringify 序列化了,是为了防止出现 json 格式错误:

其中:

  • title 是页面标题
  • body 是页面内容,类型是 form 表单
  • initApi 是用来初始化表单的 api
  • controls 是表单项,可以使 input, select, 或者纯文案
  • table 作为表单项的一部分
  • action 是表单的操作按钮,按钮有一系列行为,例如页面跳转,或者请求接口
1
2
3
4
5
6
7
8
9
10
11
12
13
14
15
16
17
18
19
20
21
22
23
24
25
26
27
28
29
30
31
32
33
34
35
36
37
38
39
40
41
42
43
44
45
46
47
48
49
50
51
52
53
54
55
56
57
58
59
60
61
62
63
64
65
66
67
68
69
70
71
72
73
74
75
76
77
78
79
80
81
82
83
84
85
86
87
88
89
90
91
92
93
94
95
96
97
98
99
100
101
102
103
104
// my-schema.js
// 详见 amis 官网
export default JSON.stringify({
title: 'Experiment Preview',
body: {
type: 'form',
mode: 'horizontal',
initApi: '/v1/campaignexperimentsrv/experiments/$id',
controls: [
{
type: 'tpl',
name: 'experiment_tag',
tpl: '${experiment_tag}',
label: 'Experiment Tag',
className: 'font-bold',
required: true,
},
{
type: 'tpl',
name: 'start_date',
label: 'Start Date',
tpl: '${start_date}',
className: 'font-bold',
required: true,
},
{
type: 'tpl',
name: 'end_date',
label: 'End Date',
tpl: '${end_date}',
className: 'font-bold',
required: true,
},
{
type: 'tpl',
name: 'traffic_split',
label: 'Traffic Split',
tpl: 'Experiment: ${traffic_split} %, Control: ${traffic_split|minus:100|abs} %',
className: 'font-bold',
required: true,
},
{
type: 'tpl',
name: 'budget',
label: 'Budget',
size: 'md',
tpl: '${budget}',
className: 'font-bold',
required: true,
},
{
type: 'tpl',
name: 'budget_manual',
label: 'Budget Manual',
size: 'md',
tpl: '${budget_manual}',
className: 'font-bold',
required: true,
visibleOn: 'this.budget === "manual"',
},
{
type: 'tpl',
name: 'kpi',
label: 'KPI',
size: 'md',
tpl: '${kpi}',
className: 'font-bold',
required: true,
},
{
type: 'divider',
},
{
type: 'static-tpl',
label: '-',
tpl: 'Showing 1-20 campaigns out of total ${number_experiments} of experiment campaigns',
},
{
type: 'table',
name: 'experiments',
label: '-',
columns: [
{
name: 'base.name',
label: 'Base Campaign',
},
{
name: 'experiment.name',
label: 'Experiment Campaign',
},
],
},
],
actions: [
{
type: 'button',
label: 'Cancel',
actionType: 'url',
blank: false,
url: '/mktautomation/experiment-tool/experiment-list',
},
],
},
})

接下来,找到项目的 router 路由,引入 json 和 renderer 函数
使用 renderer(json) 生成 vue 组件,并作为 router 的 component 传入。

1
2
3
4
5
6
7
8
9
10
11
12
13
14
15
16
17
18
19
20
21
// 引入函数
import { renderer } from '../renderer'
import schema from './my-schema'
// 路由配置
export default {
path: 'my-tool',
name: 'my_tool',
children: [
/**
* 详情
*/
{
path: 'my-list',
name: 'my_list',
component: renderer(schema), // 生成的Vue组件直接传给路由
meta: {
title: 'my List',
},
},
],
}

使用 lowcode 的缺点在于配置项异常繁杂,需要一定的时间成本来学习配置项。

所以在初期,需要投入的开发时间甚至多于直接写代码的时间。

但从长久来看,只要配置稳定,上手之后仍然是可以节省很多时间的。

以上